Viewing and Filtering Accomplishments
Video Tutorial: Data Sheet View
Section titled “Video Tutorial: Data Sheet View”View Data
Section titled “View Data”To view existing Accomplishments, click the View Data button on your dashboard. You can also click on Accomplishments in your left Navigation Bar.
NOTE: If you have more than one form in your CCB, select the appropriate (non-default) form by clicking the down-arrow (“v”) next to the word Accomplishments in your left navigation bar.
Initially, only the New, Export, Import, Data Sheet, and Saved View options will be active. If you select one accomplishment, you will see that all options become active.

Create a Saved View
Section titled “Create a Saved View”You can customize columns and data displayed when you view accomplishments and save your view (date range, fields, filtered data, etc.) so you will see the same view when you return.
-
Click on the View Data button on the dashboard or Accomplishments in your left Navigation Bar.
-
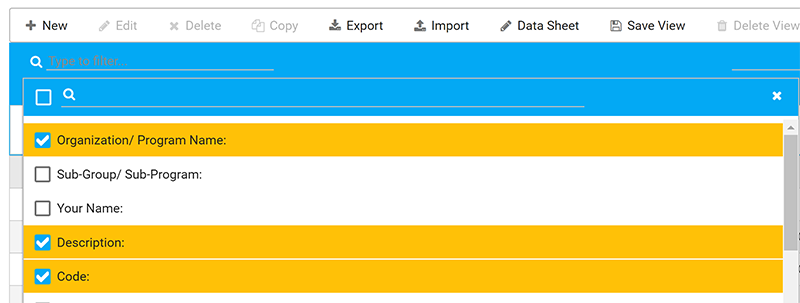
Click the Choose dropdown list on the left and select the fields you want to include. It might be difficult to read the columns if you have more than five, depending on the width or size of your monitor. We recommend four or five columns (questions) in your view.
-
If you do not want to add filters to your view, click Save View.
-
If you want to filter the data, click on Filter Accomplishments (the menu bar at the top), and it will expand, showing you all available questions and all responses that can be filtered.
Note: Multiselect, dropdown (single-select), numerical, checkbox, and date fields can be utilized. If you don’t see them listed, please ask a site admin to add them for you. Text fields (boxes and text lines) are not filterable. They don’t yield correct or consistent results due to typos, alternate responses, and other variances.
-
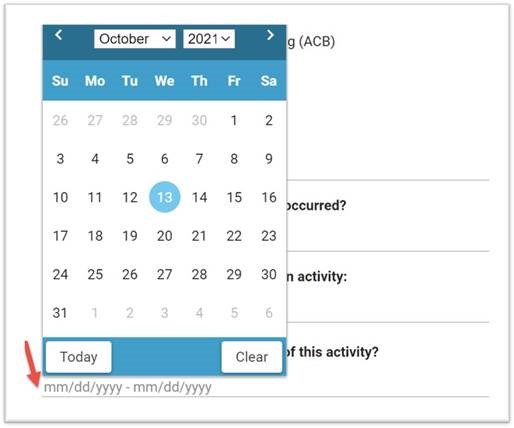
You are able to create a date range from any Date Field. Just enter the start and end dates into the field using the indicated format (mm/dd/yyyy - mm/dd/yyyy) by either the calendar picker or by typing it in.
-
After selecting all desired filters, be sure to click Apply Filter. You can review your choices by scrolling through the data.
-
Then click Save View. Your custom view will include the columns you want along with the filter you created.
-
Be sure to give your Saved View a name that will make sense to any of your CCB colleagues. Custom views are available to all users with access to the CCB.
Deleting a Saved View
Section titled “Deleting a Saved View”You can delete your Saved View two ways:
- Select the view from the available views in the top-bar dropdown, and it will load. Then click Delete View. You will revert to the Default View for your CCB form and your custom view will be deleted.
- Without loading the view first, click on Delete View(s) in the top bar. You will see a popup showing all Saved Views created in your CCB. Select one or more of them from the list, then click Delete.
Use Data Sheet View
Section titled “Use Data Sheet View”Data Sheet View can help you edit multiple entries without opening and saving each one individually. You must create a Saved View before you can use Data Sheet View. Please review the Saved View instructions above before you use these instructions.
NOTE: You can only edit text, date, and dropdown (single-select) fields in this view.
-
Click the View Data button on the dashboard.
-
Select the Saved View you want to use. You must use a saved view for Data Sheet View to work.
-
Click Data Sheet above the entries.

-
Click into the text, date, or dropdown field you want to edit.
-
Make your edits as needed. Clicking on another field will save the edit.
-
If you are adding or editing dates, please use the calendar provided. For example, you will see the calendar date of 6/20/2023 change to June 20, 2023 when it is saved.
-
When you are finished, click the navigation arrow to the upper-left of Accomplishment Data Sheet to return to the Accomplishment list.
Edit Lookup Lists
Section titled “Edit Lookup Lists”Lookup Lists are extremely helpful when you want to maintain a longer list of responses that can be used on multiple questions within the same form, or in multiple CCBs within or even outside of your initiative’s Site Collection.
For example, if you have the same list of 25 names or counties or organizations that you want to include as responses to more than one question, a Lookup List allows you to maintain that list in one place. If you update (add, delete, modify) values on the list, you do it once within the list, and anywhere that list is used, it will update automatically.
Note: Lookup Lists are integrated within the CCB system now and are no longer tied to SharePoint custom lists or SharePoint WorkStations.
One of the improvements in having Lookup Lists maintained within the CCB system is they can now be used by all initiatives systemwide. A Site Administrator (Owner) or System Administrator will need to add the Lookup List to your CCB for use, but this is helpful (for example) if more than one Site Collection would like to have a full list of counties for the state of Kansas as responses to a “county” question on the Accomplishment form.
Users at the Member level can add or modify or delete responses, but they are also welcome to reach out to an Administrator/Owner for help with this. When in doubt, contact a Site Admin/Owner.
Warning: Users should be careful about deleting or modifying existing responses/values on a Lookup List, since doing this will not update historical data, and it could cause issues with current graphs and saved filtered views. If you want to add a new response on the list, it will not affect your historical data, but keep in mind that everywhere the list is being used, the new response will appear.
For more details on creating and managing lookup lists, see Managing Lookup Lists.