Managing Forms
Admin Only: These instructions are for Site Owners/Admins and KU staff only. Individuals assigned to Contributors/Members groups will not see the Administration options mentioned below.
Correct customization of the CCB form is crucial, as it constitutes the main tool for documenting in the CCB. Our staff will work with you to create your CCB Accomplishment form(s). As a Site Admin you have the ability to manage your forms, but if you need technical assistance please contact us at toolbox@ku.edu or by calling 785-864-0533.
The aim of customizing your CCB form is to collect data in the clearest, easiest, and most specific way possible. Form customization allows Site Admins to choose or create questions that will be displayed in the Enter Data area of the CCB.
Video Tutorial
Section titled “Video Tutorial”Jump to a section in the video:
Download an Excel Template for creating a CCB form.
Before You Start
Section titled “Before You Start”Contact a member of our KU staff to provide an Excel document containing the typical form template. Four tabs provide information necessary to set up your form correctly along with helpful definitions for coding each Accomplishment entry. There are quite a few choices to make for each question — things like whether the field/question is required, if you want to use it to create filters or graphs, what “type” of field it should be (Date, Yes/No, Dropdown, Multiselect, Numerical, Custom List, Text Line, Text Box, etc.). The more you plan ahead before you start collecting data, the better off you’ll be in the end.
Creating a New CCB Form
Section titled “Creating a New CCB Form”-
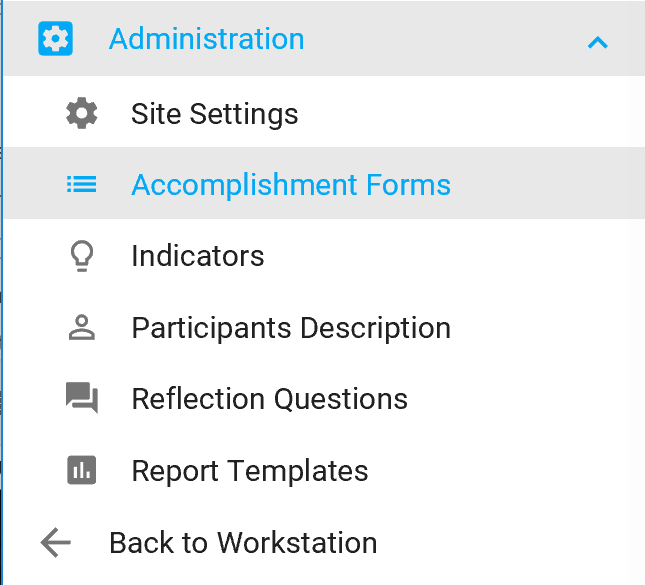
Click on Administration and then Accomplishment Forms in the left navigation bar.
-
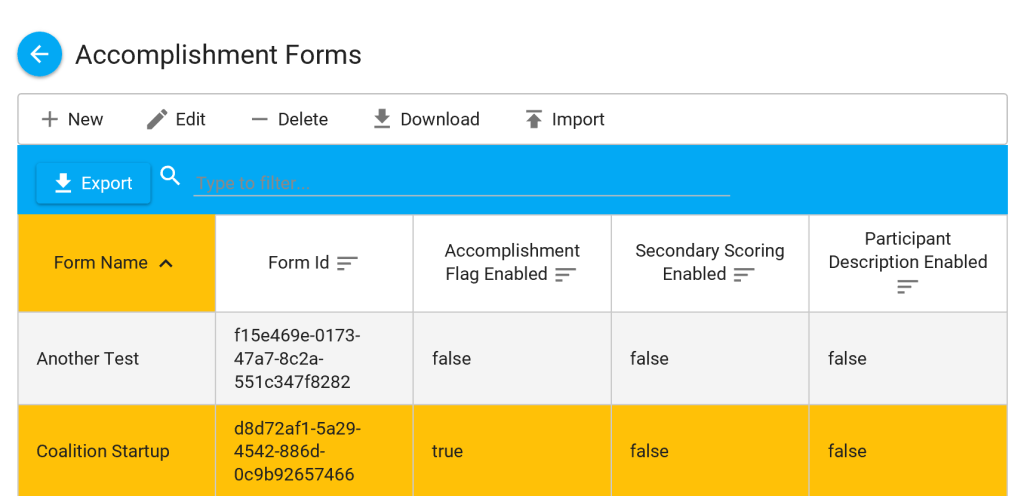
The Accomplishment Forms section allows you to:
- New — create a new form
- Edit — click once on the form, then click Edit to open it and make changes
- Delete — this will delete the entire form you have selected
- Download — saves the form you built in a text file (.txt), with all Fields, Sections, Triggers, and Help configurations preserved. Especially helpful when you want to develop a master form template for multiple CCB subsites.
- Import — allows you to import a CCB form (.txt file) you have downloaded
-
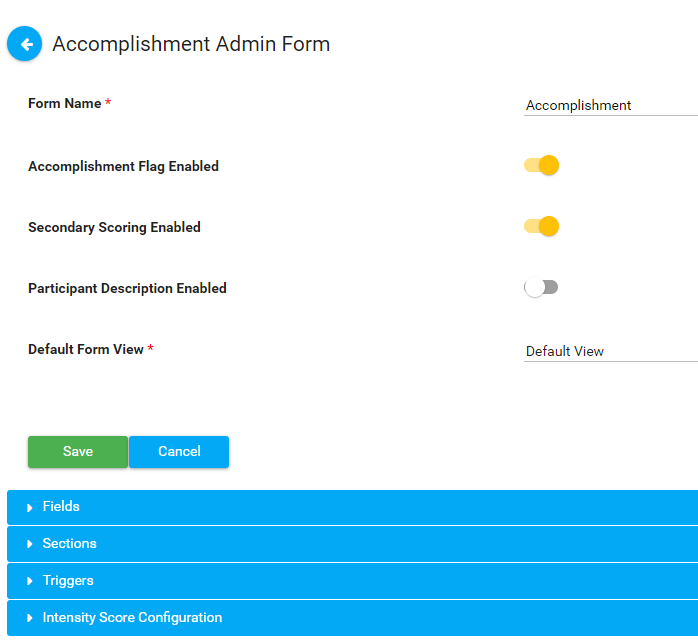
Click New to create the form and set some general preferences.
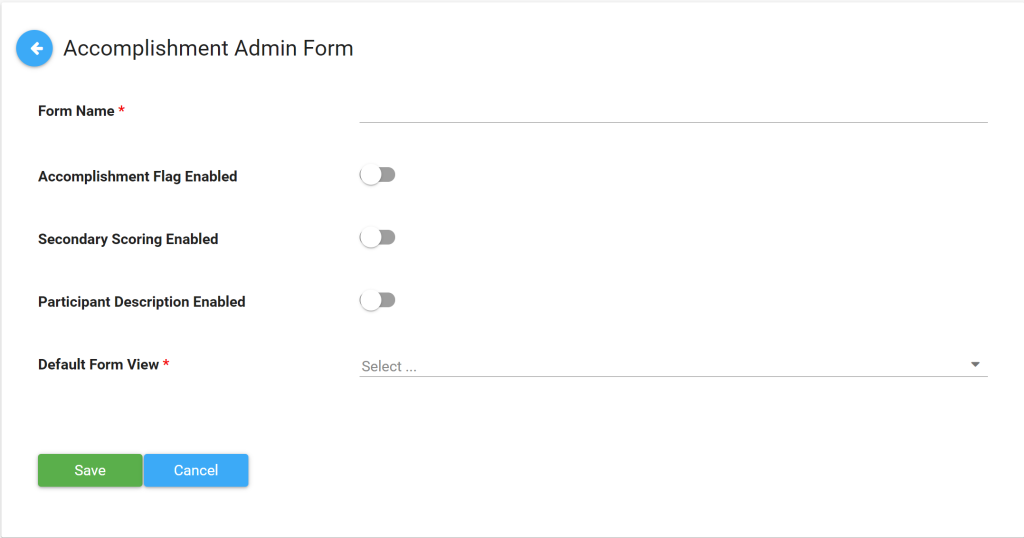
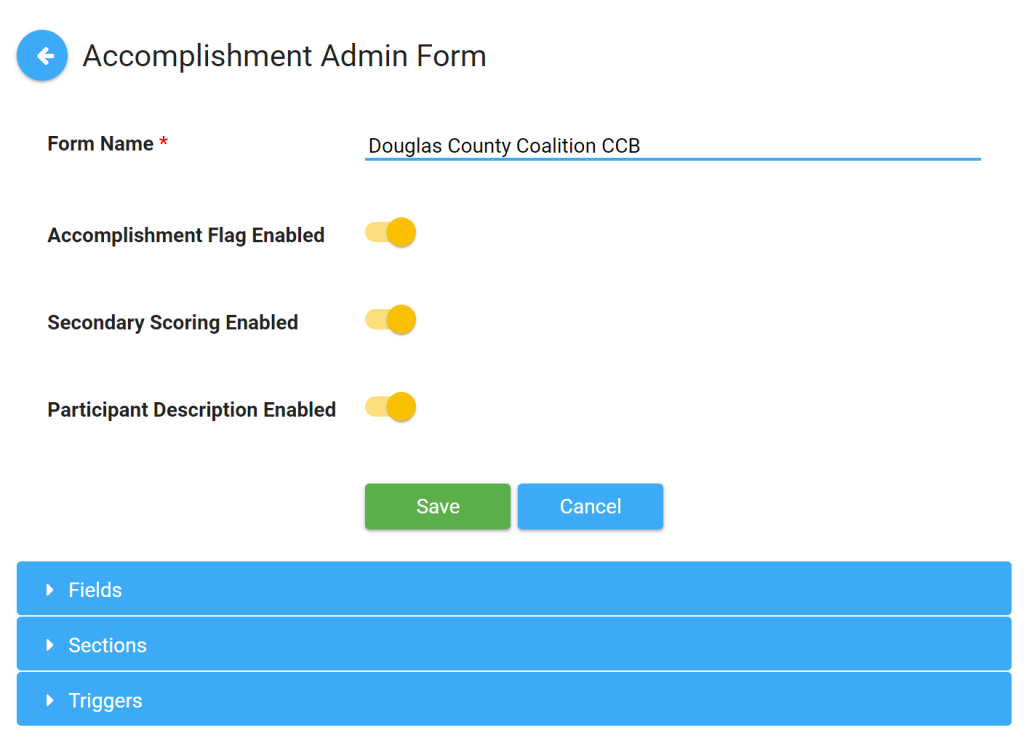
- Form Name — Name the form, e.g., Douglas County Coalition CCB
- Accomplishment Flag Enabled — If you’re using Secondary Scoring, enable this if you want flags to appear on the Accomplishments listing page. See more on Secondary Scoring.
- Secondary Scoring Enabled — Enable this if Secondary Scoring is to be performed on this form
- Participant Description Enabled — Enable this feature if you are collecting participants’ data. See more on Participants Description.
- Default Form View — The system will assign the Default View for you. You can change it after creating at least one custom Saved View.
-
Click Save to save the form, or Cancel to discard.
-
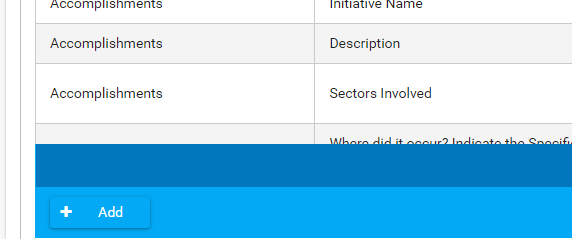
Click once to select your form, and click Edit to begin developing it. You will see three expandable bars: Fields, Sections, and Triggers.
Sections Explained
Section titled “Sections Explained”Sections are important for two reasons:
- Sections determine the display order for a group of questions.
- Sections are used for Triggers (see below).
With the exception of a few system questions at the beginning of the form, each field/question you create is assigned to a Section and given a weighted order (number) within that Section. Create Sections before you create Fields.
Section Ordering Tips
Section titled “Section Ordering Tips”- Start numbering Sections at 10 and add others in increments of ten to leave room for future sections.
- Example: If you have Sections weighted 10, 20, 30, 40 and need to insert a new section after “20,” you can give it a weight of “25” without renumbering everything.
Sections and Triggers
Section titled “Sections and Triggers”The Trigger system relies on Sections. A Trigger causes additional Sections of questions to display when a specific response to a prior question is made.
Example: You create a Field called “Do you like ice cream?” If you answer Yes, a Trigger displays a related Section with questions like “What is your favorite flavor?” If you select No, you would not see those questions.
NOTE: Triggers point to Sections, not individual Fields.
Creating Sections
Section titled “Creating Sections”-
Click the Sections bar to expand it, then click Add.
-
Enter Section Name — should be descriptive and concise. Most of the time they will not be visible to users.
-
Move the toggle to the right if you want the Section Name Displayed on the front end of the form.

What displays in a new accomplishment:

-
Enter the Display # (numerical weight). Start at 10 and add others in increments of tens.
Creating Fields (Questions)
Section titled “Creating Fields (Questions)”In the Accomplishment Admin Form section, click and expand the Fields bar.
To add a new question, click the + Add button at the bottom of the Fields section.
Column Types
Section titled “Column Types”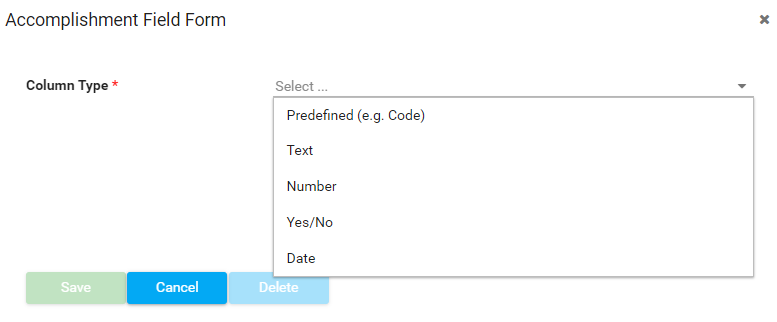
-
Predefined (e.g., Code) — Special capabilities for specific uses. Can be used only once per form:
- Code — Tied to graph displays and Secondary/Tertiary Scoring. Typically displayed as Check Boxes.
- Description — The basic description of the Accomplishment entry. Text Box field type.
- Frequency Count — Numerical field with multiplier capabilities for repeated activities.
-
Text — Field Types include:
- Check Boxes — Expanded list of predetermined responses; users may select more than one.
- Drop Down List — Expandable list; only one response can be chosen.
- Multiple Choice List — Expandable list; users may select more than one response.
- SharePoint Lookup — Lookup Lists maintained within the CCB system. See Managing Lookup Lists.
- Text Box — Write-in responses, longer-form answers.
- Text Line — Write-in responses, brief answers.
Note: Text Boxes and Text Lines are generally not graphable due to unlimited variables in spelling and punctuation.
-
Number — Numerical field with options for whole number or decimal places. Graphable with calculations.
-
Yes/No — Tri-toggle field. Not recommended — consider creating Yes/No questions as a Dropdown instead with “Yes” and “No” as choices.
-
Date — Calendar date field, usable for graphs, filters, and date ranges.
Field Options
Section titled “Field Options”
- Label — How the question will appear on the form. Must be unique within the form.
- Form Translation — Alternate version of the question in a different language.
- List Label — Shorter version for exported data and column headers.
- List Translation — Shortened version in an alternate language.
- Toggles:
- Required — Enable if the question must be answered.
- Listing — Determines which fields appear in the Default View (limit to 4-5 columns).
- Apply Filter — Makes the question available for filtering.
- Graph Enabled — Makes the question available for graphing (requires Apply Filter to be enabled too).
- Default Value — Pre-set a response (e.g., “No” for a Yes/No question).
- Display # — Numerical weight for ordering within a Section. Use increments of 10.
- Help — Text prompts displayed as a blue question mark icon next to the question.
Once finished, click Save at the bottom of the popup.
Note: To delete a field, select it on your form, open the popup editor, and click the Delete button.
Modifying Fields with Existing Data
Section titled “Modifying Fields with Existing Data”After your form is established and in use, you may need to update an existing response. For example, changing “All Children” to “All Children in School.”
- Update the response on the form itself. New data will use the new response.
- Historical data still has the original response. Your options:
- Leave historical data alone — Older responses won’t show in filters or graphs but can be exported to Excel.
- Modify existing data — Export to Excel, update entries, and import back. Be sure to export all three Observers.
Important considerations:
- If Triggers were associated with the original response, they will break. Delete and re-create them.
- Graphs featuring the old response will need to be rebuilt.
- Modifying a question label won’t affect historical data.
- Deleting a question entirely from a form will delete all historical data associated with it.
Tip: For significant updates (new grant cycle, etc.), consider cloning the form and giving it a new name rather than modifying the existing form.
Triggers Explained
Section titled “Triggers Explained”A trigger is a response mechanism that allows additional subsets of questions to display when a specific answer is chosen.
Important Things About Triggers
Section titled “Important Things About Triggers”- Triggers can be created for one or more responses to any single question.
- Triggers from a single question can make one or multiple sections display.
- It is not possible to have responses from multiple questions trigger the same section (one-to-many only, not many-to-one).
Creating Triggers
Section titled “Creating Triggers”Before You Begin
Section titled “Before You Begin”- You must have a Source Field (question) created as a dropdown or multiselect with predetermined answers.
- Create a new Section first that will display from this Trigger.

- Click the Triggers bar to expand it, then click Add.
- Select the Source Field from the dropdown menu.
- Select the Target Section from the dropdown menu.
- For more than one section from the same response, create additional Triggers.
- Select the Trigger Value(s). Multiple responses from the single question can be selected.
- Save the Trigger.
- Repeat as needed, then click Save to save the form.